
Thanks to Java Web Start, you can simply run MonaSearch by clicking the link on the homepage. This should work for the major platforms (Win, Linux, Mac); contact me if it doesn’t.
It will install a desktop shortcut after first launch, so you don’t have to start your browser each time. On platforms where this is supported, it will also insert a submenu in the main menu.
It will ask you to trust a certificate. This is necessary since MonaSearch needs access to the file system to store preprocessed tree banks and intermediate results. I brewed a home-made certificate with digital fingerprint 64:60:D0:63:92:1A:54:88:EF:E7:AE:2A:AF:24:08:54:1C:6A:AE:93. If this seems hokey to you, contact us and we’ll try to get a real certificate.
Java Web Start also takes care of automatically updating the program if a newer version is available. This will require a restart of the program.
Note that it is still necessary to install MONA first.
Java 6 (Mac users see below for where to get it).
You can install MONA by either using one of the installation packages on the homepage, or getting it from the MONA website. There is a README in the links on the homepage which would be interesting.
To check which version of java is the default type:
You should see something like this:
java version "1.6.0_06"
Java(TM) SE Runtime Environment (build 1.6.0_06-b02)
Java HotSpot(TM) Client VM (build 10.0-b22, mixed mode, sharing)
or, on 64-bit systems:
java version
"1.6.0_06" Java(TM) SE Runtime Environment (build 1.6.0_06-b02)
Java HotSpot(TM) 64-Bit Server VM (build 10.0-b22, mixed mode)
Extract MonaSearch anywhere you like. Open a terminal and cd
into the MonaSearch directory. In that directory there should be files
called MonaSearch.jar and libmona.so. To run
MonaSearch from the current directory simply type:
Alternatively, you can copy libmona.so into a directory where the JVM looks for it and omit the -D option. To find out which directories are suited for this, you have to find out what the variable java.library.path in the JVM is set to. The easiest way to find out is to run Roedy Green’s Wassup applet. You’ll have to grant it full rights, since otherwise it won’t show the restricted values, of which java.library.path is one. Typical values for Linux include /lib and /usr/lib (/usr/lib64 probably won’t do!).
Make sure the library and the java you are running are compiled for the same architecture (especially, a 32-bit Java will complain about a 64-bit library, and converse).
MonaSearch requires a 64 bit Intel Mac with Java 6. If enough people ask for a version that works with Java 5, we’ll consider making one, so feel free to ask! Java 6 for Leopard is available from Apple’s update site. If you are running Tiger you can try SoyLatte.
Whichever java you choose you’ll probably want to make it your default Java. To do that add java 6 to your path by adding the following to your ~/.profile (if you use SoyLatte modify it accordingly):
Then at the console type
Extract MonaSearch anywhere you like. Open a console and cd
into the MonaSearch directory. In that directory there should be files
called MonaSearch.jar and libmona.jnilib. To
run MonaSearch from the current directory simply type
Alternatively, you can copy libmona.jnilib into a directory where the JVM looks for it and omit the -D option. To find out which directories are suited for this, you have to find out what the variable java.library.path in the JVM is set to. The easiest way to find out is to run Roedy Green’s Wassup applet. You’ll have to grant it full rights, since otherwise it won’t show the restricted values, of which java.library.path is one. Typical values for Mac include the current directory, /Library/Java/Extensions, /System/Library/Java/Extensions and /usr/lib/java.
Extract MonaSearch anywhere you like. Open a Command Line (under
→
→
) and cd into the MonaSearch directory. In that directory
there should be files called MonaSearch.jar and mona.dll.
To run MonaSearch from the current directory simply type
Alternatively, you can copy mona.dll into a directory where the JVM looks for it and omit the -D option. To find out which directories are suited for this, you have to find out what the variable java.library.path in the JVM is set to. The easiest way to find out is to run Roedy Green’s Wassup applet. You’ll have to grant it full rights, since otherwise it won’t show the restricted values, of which java.library.path is one. Typical values for Windows include C:\Windows and C:\Windows\System32. In Windows, the PATH is also included, as is the current working directory, so if you’re in the same directory the library is, it will work without the -D parameter as well.
Make sure the library and the java you are running are compiled for the same architecture (especially, a 32-bit Java will complain about a 64-bit library, and converse).
At the first execution, MonaSearch will ask you to choose a directory where preprocessed treebanks and temporary results can be stored. While you can choose any directory for this purpose, it is not necessary to access it yourself at any time. Therefore, it is recommended to make it a hidden directory. Suggested places are:
Java remembers where this directory is in a preference file. A lot of other stuff is stored there as well, such as the window size, the location of the last edited file and treebank and so on. If something goes awry you can try deleting those settings, have a look at Roedy’s page on Java preferences for how to get at them.
The main window allows you to compose queries and submit them for
querying. Several related tasks can be done here, such as selecting a
treebank and saving the queries to file.
For people in a hurry, here is a quick summary of the steps:
First of all you will want to choose a treebank to pose your queries on. You can do this by clicking the button “Treebank” and choosing a file. For now, only the NEGRA export format is supported.
The first time, MonaSearch will precompile the treebank and store this information in the directory you chose at first execution. As long as this process is going on, you cannot submit queries, but you can already start composing them.
The central field is a kind of scrap book with formulas. When constructing a query, most people think in a bottom-up fashion focusing first on the atomic relations. This approach is systematically supported: first you add the atomic properties such as node labels or relations between nodes (like dominance), then complex formulas are constructed from simpler ones via boolean connectives and quantification.
Base formulas are divided in two sorts: properties of nodes and relations between nodes or between nodes and node sets. Properties of nodes are linguistic labels such as the category of function for non-terminal nodes and word, lemma, morphology or part-of-speech information for terminal nodes. Relations between nodes can be various forms of dominance, precedence and equality, whereas relations involving node sets can be the containment of a node in a set or the equality of sets.
To enter a base formula, choose the appropriate formula from the “Base” menu. A dialog will show up asking for the name of the node or node set involved. A second dialog will ask you for the name of the second node or node set in case of a binary relation; in case of a node property, the dialog will ask for the value of that particular property.
The names of variables can be chosen freely, with the restriction that names for nodes must be lowercase and names of node sets must be upper case, as is usual in logic.
Linear precedence is defined bottom up. I.e., it is firstly defined on the terminal nodes, because they have a clearly defined linear order. For internal nodes u and v it is defined that u precedes v iff the complete subtree dominated by u precedes the complete subtree dominated by v.
In case of crossing branches this means that neither u precedes v nor vice versa.
Formally: u linearly precedes v if for there is are nodes x, y, z such that y and z are daughters of x, y is to the left of z, y dominates u and z dominates v.
Once the base relations have been entered, you will want to combine them to more complex formulas. In order to do this, you select the formulas to be combined; you can either do this by clicking on them while holding the Ctrl key, or by holding the Shift key and using the arrow keys.
For implication, the order of the formulas is important; the upper one will be considered the first one. If need be, you can swap formulas by selecting them and choosing “Swap” in the “Query” menu, or by dragging them around with the mouse.
For conjunction and disjunction, you can select an arbitrary number of formulas.
For the different kinds of quantification, the name of the variable that is quantified over will be asked in a dialog.
The newly created formula will appear at the top of the scrap book.
An important restriction on supported queries is that they have to be closed. This means that for every variable which occurs in the formula, there must be a quantification over it, either universal or existential. If you do not know what to do with your variables, it is safest to just put existential quantifiers before each of them.
Now that your query is finished, you can submit it. Select it and click the “Submit” button. After a while a window will pop up showing you the results of the query.
The results, if any, are presented as a list of tree identifiers.
This identifier is the number or the tree in the original treebank file.
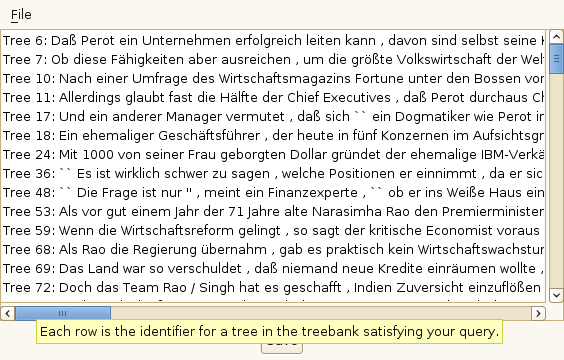
We are working on a visualization component which will show you the tree and the sentence, check back in a next release!
You can save your results by hitting the save button. They will be stored as a simple text file containing one result per line.
Since composing queries is tedious, you do not want to do this over and over again. Therefore, it is possible to store the queries in a file. Choose “Save” in the “File” menu and enter the name of the file. You can then open this file next time to continue editing the queries or resubmitting them by choosing “File” → “Open”.
For power users, there are a lot of keyboard shortcuts available:
| Command | Shortcut |
|---|---|
| Submit | Enter |
| Choose treebank | Ctrl + T |
| Open file | Ctrl + O |
| Save file | Ctrl + S |
| Save file as | Ctrl + Shift + S |
| Quit MonaSearch | Ctrl + Q |
| Delete a query | Delete |
| Clear the query field | Ctrl + Delete |
| Dominance | Ctrl + D |
| Proper dominance | Ctrl + G |
| Immediate dominance | Ctrl + y |
| Precedence | Ctrl + P |
| Equality | Ctrl + Z |
| Membership (inclusion) | Ctrl + I |
| Category | Ctrl + C |
| Word | Ctrl + W |
| Morphology | Ctrl + M |
| Lemma | Ctrl + L |
| Grammatical function | Ctrl + F |
| Negation | Ctrl + R |
| Conjunction | Ctrl + A (broken) |
| Disjunction | Ctrl + V |
| Implication | Ctrl + J |
| Universal quantification | Ctrl + U |
| Existential quantification | Ctrl + E |
| Save results | Ctrl + S |
| Close result window | Ctrl + W |
For scripting purposes, a simple command line interface is provided. The usage message is as follows:
Usage:
MonaSearch [options] <query>
options
  --help (-?,-h)            print this message
  verbosity                 determines how much information is written to the
                            command line
    --quiet (-q)            be extra quiet
    --verbose (-v)          be extra verbose
  --logfile (-l) <file>     use given file for log
  --treebank (-t) <name>    use the given treebank (identified by its name)
  --baseFileDir <dir>       directory where additional metadata, such as
                            preprocessed treebanks and precompiled queries
                            reside
The results of the query are written to the standard output, so in the simplest case, this means you would simply invoke it as follows:
All the other options are set to sensible defaults automatically. That is, just like in the GUI, your preferences are stored containing which treebank you last queried, what the base directory as etc. You can however specify a treebank, a directory to store intermediate results and a logfile.
These options are also remembered from the graphical user interface, so the easiest thing to do is to run MonaSearch in graphical mode once and set all options as wanted. Then afterwards you only need to specify the query at the command line.
As of now the verbosity options do nothing, but this is WIP. Do tell which information you would like to see.
The syntax of formulas is LISP-like, i.e., each (sub-)formula is surrounded by braces (), and there is a strict prefix notation, the functional head always comes first.
Formulas are divided into atomic formulas and complex formulas. Atomic formulas are further divided into 2 groups. The first group comprises formulas for node labels, the second group comprises relations between nodes and between nodes and sets of nodes.
The same restriction as in the GUI holds: queries must be closed. When in doubt, simply prefix an appropriate number of existential quantifiers.
In the following, let x and y be variables, φ, φ1, φ2, φ3, … and ψ formulas.
A variable is a string of letters or numbers, delimited by white space. Examples: x,y, z, X,Y, Z, v12, V21, 3, … By convention, lowercase letters are used for first-order variables and uppercase letters are used for second-order variables, but the syntax is precise enough that this does not have to be enforced.
All label descriptions are expected to be regular expressions as provided by Java. Normally, this should not bother you, but if you get unexpected results, try escaping special symbols with a double backslash.
(> x y)x is the mother of y(>+ x y)x properly dominates y>+ is the transitive closure of >
(. x y)x precedes y(= x y)x and y(in x X)x is a member of set X(sub X Y)X is a subset of set Y(= X Y)X and Y(! φ)φ(& φ1 … φn)(| φ1 … φn)(-> φ ψ)(<-> φ ψ)(A1 x φ)x in the
formula φ(E1 x φ)x in
the formula φ(A2 X φ)X in the
formula φ(E2 X φ)X in
the formula φDevelopers can discuss stuff on the Launchpad page.
[∗] To know what %APPDATA% looks like, open a run command (WinKey+r) and enter it there. Using this directory will probably work well in Windows XP, but I am unsure about Vista. Please report suggestions/problems.

